Getting VAN 9001 or VAN 9003 at launch? On Windows 11, Riot Vanguard requires TPM 2.0 and UEFI Secure Boot. Here you check in one minute what’s missing and turn both on step by step in the BIOS – with menu paths for ASUS, MSI, Gigabyte and ASRock.
Last updated: October 7, 2026

On Windows 11, Valorant requires TPM 2.0 and UEFI Secure Boot. Without TPM 2.0, Vanguard shows VAN 9001; without Secure Boot you get VAN 9003. The fix is almost always in the BIOS: turn on Intel PTT or AMD fTPM, disable CSM/legacy, set boot mode to UEFI, enable Secure Boot – and if your drive still uses MBR, convert it to GPT with mbr2gpt first. On Windows 10, Riot currently doesn’t require either.
Shortcut: 1 click instead of 10 windows
Check your PC with the free Valorant Check
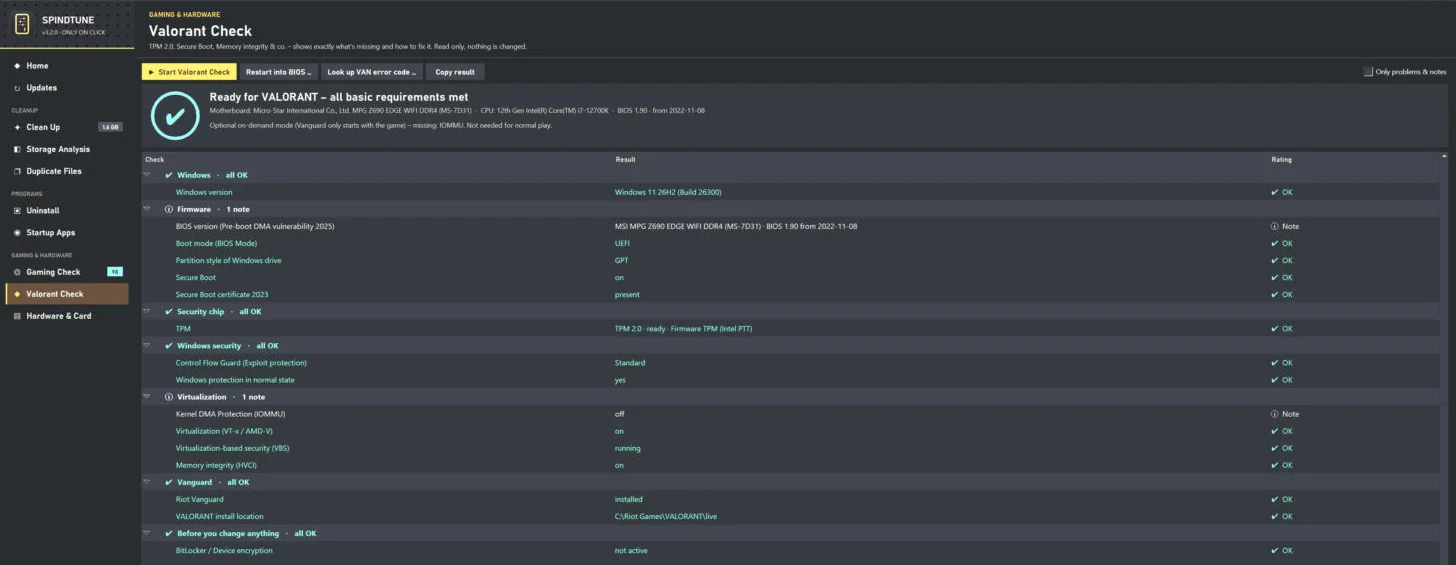
Our free tool SpindTune checks TPM 2.0, Secure Boot, UEFI mode, partition style, memory integrity and Vanguard in 10 to 30 seconds – and shows you the BIOS steps for your exact motherboard. No account, no ads, read only.
That depends on your Windows version. On the official VALORANT specs page, Riot states that Windows 11 additionally requires TPM 2.0 and UEFI Secure Boot. Riot doesn’t list this requirement for Windows 10. The reason is the anti-cheat system Riot Vanguard: it uses the security chip and the protected boot process to verify that no tampered code was loaded before Windows.
| Windows 10 | Windows 11 | |
|---|---|---|
| Minimum version | build 19041 (20H1) or newer, 64-bit | 64-bit, kept up to date |
| TPM 2.0 | currently not normally required | required (otherwise VAN 9001) |
| UEFI Secure Boot | currently not normally required | required (otherwise VAN 9003) |
| Special case VAN:RESTRICTION | can require Windows updates up to build 19045 | can require TPM 2.0, Secure Boot, HVCI or IOMMU |
| Vanguard on-demand mode | not available | from Windows 11 25H2, only with the full security stack |
The good news: almost every PC that officially got Windows 11 already has TPM 2.0 and supports Secure Boot, because Microsoft requires both for Windows 11. On many custom-built PCs they’re simply turned off in the BIOS – or Windows was installed in the old legacy mode. Both can be fixed.
Riot Vanguard reports missing security features with fixed codes. Here’s how to read them:
| Code | Meaning | Fix |
|---|---|---|
| VAN 9001 | TPM 2.0 is not enabled or not detected | turn on Intel PTT / AMD fTPM in the BIOS |
| VAN 9003 | Secure Boot is not enabled | enable UEFI mode + Secure Boot |
| VAN 9090 | TPM 2.0 couldn’t initialize, often after the TPM was cleared | set up the TPM again, restart |
| VAN 9006 | Windows too old – Windows 10 20H1 or newer required | install all Windows updates |
| VAN:RESTRICTION | Vanguard requires a Windows update or a security feature | install updates, enable TPM 2.0 / Secure Boot / HVCI / IOMMU |
| VAN:RESTRICTION: 1 | Secure Boot couldn’t be verified (off, no UEFI or outdated BIOS) | check Secure Boot, then update the BIOS |
| VAN:RESTRICTION: 3 | game couldn’t be verified from its install drive | check the install location |
| VAN:RESTRICTION: 4 | Secure Boot configuration couldn’t be verified | enable Secure Boot, restart |
| VAN:RESTRICTION: 5 | memory integrity (HVCI/VBS) isn’t running correctly | Core isolation → Memory integrity on |
| STATUS_SB_POLICY | problem with the Secure Boot configuration | reset the Secure Boot keys to factory defaults |
By the way: Riot now describes VAN 1067 as a general Vanguard startup error – start with Windows updates, setting the Vanguard service to “Automatic” and a restart there. Every other code is in our overview of VAN error codes.
Before you go into the BIOS, check in Windows what’s actually missing. It takes one minute:
Win + R, type tpm.msc and hit Enter. Under “Status” it should say “The TPM is ready for use”, and under “TPM Manufacturer Information” the specification version should be 2.0. If you see “Compatible TPM cannot be found”, the chip is turned off in the BIOS.Win + R → msinfo32 → Enter. In System Summary, “BIOS Mode” must say UEFI and “Secure Boot State” must say On. If BIOS Mode says “Legacy”, Windows runs in the old legacy mode.On Windows 11 the most reliable way is through Windows itself: Settings → System → Recovery → Advanced startup → Restart now, then Troubleshoot → Advanced options → UEFI Firmware Settings → Restart. Alternatively, press the BIOS key repeatedly while the PC turns on. In the BIOS you usually save with F10 (“Save & Exit”).
| Manufacturer | Key at startup |
|---|---|
| ASUS | Del or F2 |
| MSI | Del |
| Gigabyte | Del |
| ASRock | F2 or Del |
| Dell | F2 |
| HP | Esc, then F10 |
| Lenovo | F1 or F2 (some laptops: Novo button) |
| Acer | F2 |
Suspend-BitLocker -MountPoint "C:" -RebootCount 1).Most PCs from around 2017 onward have a built-in firmware TPM – you don’t need to buy a chip. On Intel it’s called Intel PTT (Platform Trust Technology), on AMD AMD fTPM. Riot points out that a discrete TPM chip is enough for VAN 9001, but VAN:RESTRICTION can require a firmware TPM. Here’s where to find the switch on the big motherboard brands:
| Motherboard | Intel | AMD |
|---|---|---|
| ASUS | Advanced → PCH-FW Configuration → PTT to “Enable” | Advanced → AMD fTPM configuration → TPM Device Selection to “Firmware TPM” |
| MSI | Settings → Security → Trusted Computing → Security Device Support to “Enable”, then TPM Device Selection “PTT” (Intel) or AMD fTPM switch “AMD CPU fTPM” (AMD) | |
| Gigabyte | Settings → Miscellaneous → Intel Platform Trust Technology (PTT) to “Enabled” | Settings → Miscellaneous → AMD CPU fTPM to “Enabled” |
| ASRock | Security → Intel Platform Trust Technology to “Enabled” | Advanced → CPU Configuration → AMD fTPM switch to “AMD CPU fTPM” |
| Dell / HP / Lenovo / Acer | usually under “Security”: “TPM 2.0 Security”, “TPM Embedded Security” or “Security Chip” to “On”/“Enabled” – depending on the model | |
After saving, the PC restarts. Open tpm.msc again: if it says “The TPM is ready for use” with version 2.0, VAN 9001 is solved. If you only see “TPM 1.2”, that’s too old for Valorant on Windows 11 – a BIOS update that switches many boards to 2.0 helps, or use the firmware TPM instead of an old plug-in module.
Secure Boot only works in UEFI mode and only with a drive in GPT format. That’s why the order matters: if you simply switch the BIOS to UEFI while Windows still sits on an MBR drive, your PC won’t boot anymore. Riot explicitly warns about this.
msinfo32: BIOS Mode “UEFI”, Secure Boot State “On”.| Motherboard | How to |
|---|---|
| ASUS | Boot → CSM → Launch CSM “Disabled” · Boot → Secure Boot → OS Type “Windows UEFI mode” · Secure Boot Mode “Standard”; if “Custom”: Key Management → “Install Default Secure Boot keys” |
| MSI | Settings → Advanced → Windows OS Configuration → BIOS UEFI/CSM Mode “UEFI” · Settings → Security → Secure Boot → “Enable” (some boards: under Windows OS Configuration), mode “Standard” |
| Gigabyte | Boot → CSM Support “Disabled” · Boot → Secure Boot → “Enabled”; Secure Boot Mode “Custom” → “Restore Factory Keys” → Yes, then check that it says “Active” |
| ASRock | Boot → CSM “Disabled” · Security → Secure Boot → “Enabled” (mode “Standard”; if “Custom”: “Install Default Secure Boot keys”) |
| Dell / HP / Lenovo / Acer | boot mode “UEFI” (legacy off), then Secure Boot “Enable”; on Acer you often have to set a supervisor password first, otherwise the switch is locked |
Windows has its own tool for this: mbr2gpt (Windows 10 version 1703 and later). It converts the system drive without deleting data – but the step can’t be undone. So back up your important files first.
mbr2gpt /validate /allowFullOS. If you get “Validation completed successfully”, you can convert.mbr2gpt /convert /allowFullOS and wait for the success message.mbr2gpt /validate check for you and show the result – SpindTune deliberately doesn’t do the actual conversion. That decision is yours.The TPM was cleared or isn’t fully set up. Restart the PC, check the status in tpm.msc and let Windows finish the setup.
Secure Boot is on, but the configuration is off. Reset the Secure Boot keys to factory defaults in the BIOS – suspend BitLocker first.
If Secure Boot is already on, Riot recommends a BIOS update. Only get the file from your motherboard maker’s support page.
Windows Security → Device security → Core isolation → turn on Memory integrity and restart. Old drivers can block it.
Run Windows Update completely and restart. Vanguard needs current security and system services.
If nothing helps: uninstall Riot Vanguard, restart and launch the game – Vanguard then installs fresh.
Secure Boot certificates 2026: Microsoft is replacing the Secure Boot certificates from 2011. According to Microsoft they expire as follows: KEK CA 2011 on June 24, 2026, UEFI CA 2011 on June 27, 2026 and Windows Production PCA 2011 on October 19, 2026. They’re replaced by new 2023 certificates that most PCs get automatically via Windows Update or a BIOS update. Devices without the new certificates keep booting normally but no longer get new security updates for the boot process. Riot hasn’t linked this to Valorant errors so far. SpindTune’s Valorant Check shows whether your PC already has the new certificates.
Since June 2026, Riot offers an optional mode where Vanguard no longer starts with Windows but only with a Riot game – and shuts down afterwards. Riot calls the compatibility check “Vanguard Pre-Check”; you start it from the Vanguard icon in the system tray. The requirements are strict:
According to Riot, about 35% of players already meet every requirement. On-demand mode isn’t needed for normal play – if you don’t use it, just let the Vanguard service start automatically as before.
On Windows 10, Valorant runs from build 19041 (version 20H1) – Riot currently doesn’t normally require TPM 2.0 and Secure Boot there. However, Microsoft ended regular support for Windows 10 on October 14, 2025, and Riot can require newer builds via VAN:RESTRICTION. According to Riot, updating to build 19045 is sometimes enough on Windows 10; if Vanguard requires build 26100 or newer, that only works on Windows 11. If you’re switching anyway, set up TPM and Secure Boot right away.
Once Valorant launches again, the next question is usually: how do I get more FPS and less input lag out of my PC? Many “optimize Windows 11 for gaming” guides recommend flipping exactly the switches Vanguard needs. If you play Valorant, optimize your PC for gaming without tearing down the security baseline you just set up. These settings are safe and make a real difference:
Safe – go ahead and change these
Hands off – this can block Valorant
Memory Integrity deserves a closer look: in its support article on gaming performance in Windows 11, Microsoft writes that Memory Integrity and the Virtual Machine Platform (VMP) can cost performance in some configurations and allows turning them off for gaming – noting that the PC is then more vulnerable. For Valorant, that’s playing with fire: if Vanguard requires the feature, the game simply won’t start. Our advice: leave Memory Integrity on. You’ll gain FPS more safely with the points in the “Safe” list above.
Free · Windows 10 & 11
One click shows what your PC is missing for Valorant
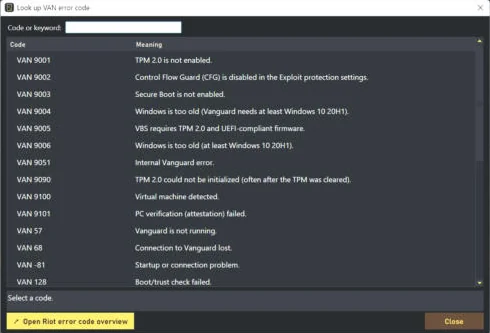
The Valorant Check in SpindTune explains every item, names the BIOS path for your motherboard, looks up 27 VAN codes and restarts your PC straight into the BIOS if you want. Plus cleanup, updates and a Gaming Check. No account, no ads, no telemetry.
VAN 9001 and VAN 9003 sound dramatic, but they’re almost always just two switches in the BIOS: firmware TPM on (Intel PTT or AMD fTPM) and Secure Boot on. It only gets tricky if Windows is still installed in legacy mode on an MBR drive – then the rule is: convert with mbr2gpt first, then switch to UEFI.
Check in Windows first what’s missing, back up your recovery key if you use BitLocker and stick to the order. Or skip the hunt: SpindTune’s free Valorant Check shows you in seconds what’s missing and where the switch sits on your motherboard.
On Windows 11, yes: Riot requires TPM 2.0 there, otherwise you get VAN 9001. On Windows 10, TPM 2.0 currently isn’t normally required, but it can be required via VAN:RESTRICTION.
On Windows 11, yes: without active UEFI Secure Boot, Vanguard reports VAN 9003. Secure Boot only works in UEFI mode with a GPT drive.
VAN 9001 means Vanguard requires TPM 2.0 but doesn’t detect it as enabled. Usually the firmware TPM (Intel PTT or AMD fTPM) is turned off in the BIOS.
VAN 9003 means Secure Boot isn’t enabled. In the BIOS, turn off CSM/legacy, set boot mode to UEFI and enable Secure Boot – on an MBR drive, convert it to GPT with mbr2gpt first.
Press Win + R, type tpm.msc and confirm. If it says “The TPM is ready for use” and specification version 2.0, you’re all set.
Open msinfo32 with Win + R. In System Summary, “BIOS Mode” must say UEFI and “Secure Boot State” must say On.
Usually not. If Windows sits on an MBR drive, convert it to GPT without data loss using the Windows tool mbr2gpt, then switch the BIOS to UEFI and Secure Boot. A backup beforehand is still a must.
The switches themselves can’t. There are two traps: if you switch to UEFI while Windows still sits on an MBR drive, the PC won’t boot – switching back fixes it. And with BitLocker on, Windows may ask for the recovery key, so back it up first.
On Intel the option is usually called “Intel PTT” or “Platform Trust Technology”, on AMD “AMD fTPM”. Depending on the brand it sits under Security, Trusted Computing, Advanced or Miscellaneous.
An optional mode since June 2026: Vanguard only starts with a Riot game instead of with Windows. It requires Windows 11 25H2 or newer, TPM 2.0, Secure Boot, VBS, memory integrity (HVCI) and IOMMU. It isn’t needed for normal play.
Currently, usually yes – Riot only requires TPM 2.0 and Secure Boot on Windows 11. However, Vanguard can require newer builds or security features via VAN:RESTRICTION, and regular support for Windows 10 ended on October 14, 2025.
Sources: Riot Games – VALORANT specs (playvalorant.com/specs), Riot Support articles “Enable TPM 2.0”, “Secure Boot”, “Error VAN 9001”, “Error VAN 9003”, “Error VAN 9090”, “Error VAN 9006”, “Error VAN 1067”, “Error VAN: RESTRICTION” (incl. 1, 3, 4, 5), “VAN: STATUS_SB_POLICY” and “Vanguard Pre-Check” (February to July 2026); Microsoft KB5062710 “Windows Secure Boot certificate expiration and CA updates”; Microsoft Support “Options to optimize gaming performance in Windows 11” and KB2563254 (registry cleaners); Tom’s Hardware, June 25, 2026. BIOS paths: manufacturer information, may differ by board and BIOS version. Retrieved October 7, 2026. You make changes to the BIOS/UEFI and partitions at your own risk – see the disclaimer.
