All 24 callouts on the official map, ropes and towers explained, the pro meta with real numbers and concrete attack and defense tips – plus a callout quiz to learn Split in minutes.
New to Valorant? The app has your backLocker value in VP & euros and a coach with heatmaps – ideal alongside “Split guide”, 100% local, no login, free.
The official Split minimap from the Valorant API shows all 24 callouts in their real position. Tap your way around the map or test yourself in the callout quiz – so the names stick before your next match.
1Tap a dot or a name – the map shows the area and nearby callouts.
2Use the filters and “All names” to learn one area at a time.
3“Start quiz”: 10 random callouts, you tap the right spot.
What the map does for you
You make precise callouts in matches instead of “one back there”.
You understand where rotations run and which areas connect.
The quiz trains fast recall – exactly what counts in a match.
All positions come from the official map – no made-up names.
Tip: combine “All names” with a filter for one side to learn Split fastest – start with the side you play most, then the rest.
⚡ Quick answer
Split is a Valorant map with two spike sites (A and B) and three lanes, set in Tokyo’s Shinjuku district. The official map has 24 callouts. Its defining features are the ropes (ascenders), the elevated mid and a tall tower at each site. Split has been back in the map pool since patch 11.08 and is part of the current Act V pool. In pro play, Viper and Omen are the standard on Split – often without a classic sentinel at all.
How to use the interactive Split map
Above you see the official Split minimap from the Valorant API with all 24 callouts exactly where the game itself places them. Tap a dot or a name in the list: the map highlights the callout and shows you its area and neighboring callouts. Use the filters to show only A, B, mid or the spawns. Because Split is so vertical, “All names” is especially helpful – you instantly see how close Rafters, Tower and Ramps are to each other at A.
The callout quiz tests you on ten random callouts. On Split that’s particularly worth it, because many names exist at both A and B – Lobby, Rafters, Tower, Back, Site. Call “Tower” without A or B and you may send your team to the wrong side. For all 13 maps, check out the full callout trainer.
Split at a glance
Official Split splash artwork (source: Valorant API)
Property
Value
Release
Closed beta 2020 · in the game since launch on June 2, 2020
Setting
Shinjuku, Tokyo, Japan
Spike sites
2 (A and B)
Lanes
3
Callouts
24 (official map)
Special feature
Ropes (ascenders), elevated mid, a tower at A and at B
In the pool
Yes – since patch 11.08 (October 14, 2025)
Split is one of the original maps: it was already playable in the 2020 closed beta, under the internal codename “Bonsai”. The setting is Shinjuku in Tokyo, where, according to Valorant’s lore, the Kingdom Corporation is expanding aggressively – against the resistance of residents who don’t want to give up their homes and cultural heritage. Riot’s official description sums it up: if you want to go far, you have to go up. Two sites split by an elevated center, and at each site a looming tower that is vital for control.
Split’s mechanics: ropes, towers and height
According to the Valorant Wiki, Split was the first map with ascenders – the ropes you glide up and down on. They make it more vertical than any other map in the pool.
The ropes (ascenders)
You’ll find ropes in three places: between A Sewer and A Lobby on the attacker side of A, from B Hell (the area below the tower) up to B Tower, and in mid inside the Vents. On a rope you move fast but predictably. Important: if you get hit on a rope, you are slowed by the hit just like on the ground (tagging, since patch 1.09). A contested rope is therefore a trap – use it when the path is safe, not in the middle of a firefight.
The towers at A and B
Each site has an elevated tower – A Tower and B Tower – with the Rafters right next to it, which many players call “Heaven”. From up there you control large parts of the site. For attackers, that means a site take on Split is hard to win without a smoke or flash on Tower and Rafters. For defenders, the opposite applies: whoever plays up top should reposition after the first kill, because every attacker knows where to look.
Tight chokes instead of open space
Unlike Ascent, Split has no wide, open mid. The paths are narrow, twisty and spread across several levels. That favors utility and close-range fights over long aim duels. Viper walls and Omen smokes cut off the narrow passages perfectly – one reason pro teams almost always run two controllers on Split.
Split rule of thumb: whoever has the height has the site. Whoever has mid has the rotation. Only use ropes when nobody is aiming at you.
All 24 Split callouts explained
The table shows every callout on the official map with its area and the three spatially closest callouts. Note that many names exist at both A and B – always include the side.
Callout
Area
Nearby
A Back
A side
A Site, A Screens, A Rafters
A Lobby
A side
A Sewer, A Main, A Ramps
A Main
A side
A Rafters, A Ramps, A Lobby
A Rafters
A side
A Tower, A Site, A Ramps
A Ramps
A side
Mid Vent, A Rafters, A Main
A Screens
A side
A Back, A Site, A Tower
A Sewer
A side
A Lobby, A Ramps, A Main
A Site
A side
A Rafters, A Back, A Tower
A Tower
A side
A Rafters, A Site, A Ramps
Mid Bottom
Mid
Mid Top, B Link, Mid Mail
Mid Mail
Mid
Mid Top, B Tower, B Stairs
Mid Top
Mid
Mid Mail, Mid Vent, Mid Bottom
Mid Vent
Mid
A Ramps, Mid Top, A Tower
B Alley
B side
B Back, B Rafters, B Site
B Back
B side
B Site, B Alley, B Rafters
B Garage
B side
B Lobby, B Site, B Link
B Link
B side
B Lobby, Mid Bottom, B Garage
B Lobby
B side
B Link, B Garage, Mid Bottom
B Rafters
B side
B Tower, B Site, B Stairs
B Site
B side
B Back, B Rafters, B Alley
B Stairs
B side
B Tower, B Rafters, Mid Mail
B Tower
B side
Mid Mail, B Rafters, B Stairs
Attacker Spawn
Attacker spawn
Mid Bottom, B Link, B Lobby
Defender Spawn
Defender spawn
B Stairs, A Tower, B Alley
A side: Lobby, Main, Ramps and the tower
Attackers start their A push from A Lobby; right below it is A Sewer, which is connected to Lobby by rope. A Main leads onto A Site. From mid you reach A via A Ramps, which border Mid Vent directly. On site, A Rafters and A Tower dominate and sit close together. At the back of the site are A Back and – toward defender spawn – A Screens.
Mid: Top, Bottom, Mail and Vent
Split’s mid is small but decisive. From the attacker side you move through Mid Bottom up to Mid Top. Right next to it is Mid Mail, which borders B Tower, and Mid Vent leads toward A Ramps. Whoever holds mid can attack or defend both A (via Vent and Ramps) and B (via Mail and Tower) from the flank.
B side: Lobby, Garage and Tower
On the attacker side are B Lobby and B Link, which leads to mid. B Garage sits between B Lobby and B Site. Above the site are B Rafters and B Tower. On the defender side you’ll find B Stairs (toward defender spawn), B Alley to the left of the site and B Back at the bottom edge of the map.
Is Split in the map pool? Rotation history
Yes. Split has been in rotation since patch 11.08 (October 14, 2025) and is also part of the pool used for Competitive since patch 13.04 (August 18, 2026): Ascent, Abyss, Haven, Lotus, Split, Summit and Sunset. That means Split hasn’t missed an act change since October 2025.
Split’s history is eventful: with patch 5.0 in June 2022 the map was rotated out for the first time. With patch 6.0 in January 2023 it returned with a bigger rework – A Main was widened, A Tower restructured and B Tower simplified. Even after that, Split was out of the pool at times. You can see all current maps on our Valorant maps & map pool overview.
Earlier patches shaped Split too: patch 2.01 widened the B Main doorway and expanded the plant zone, and patch 1.0 restructured the mid chokepoint. Newer patches such as 13.00 and 13.01 mostly brought bug fixes, for example around the wooden covers and in B Garage.
Split pro meta: who gets picked
Split is a true controller map. The presence values show in what percentage of maps an agent was picked by at least one team – the source is our pick rate overview (vlr.gg, VCT 2026 Americas Stage 2, 150 maps played).
Presence = share of pro maps played on Split in which at least one team picked the agent · data: vlr.gg, VCT 2026 Americas Stage 2 (150 maps in total)
Viper sits at 100%, Omen at 94%. Double controller is the standard on Split: Viper’s Toxic Screen cuts an entire site in half, while Omen’s Dark Cover shuts the narrow passages. Behind them come Neon (75%) as a fast entry, Fade (59%) for information and Phoenix (50%). Notably, classic sentinels are rare – Cypher is at just 16%, Chamber at 9%. Many pro teams prefer more attacking utility on Split instead.
Split: Most-played pro comp (7 of 29) · source: vlr.gg, VCT 2026 Stage 2 (4 regions) + Champions 2026
The most-played pro comp on Split is Neon, Phoenix, Fade, Omen, Viper – it appeared in 7 of 29 recorded comps (source: vlr.gg, VCT 2026 Stage 2 across four regions plus Champions 2026). Double smoke cuts the tight chokes, while Fade and Phoenix set up Neon’s fast entry with information and flashes. Try your own variations in the team comp builder.
Attacking on Split: tips for the attacker side
On Split, attacks are set up in mid. Control Mid Top and Mail and you can hit both sites from two directions.
Mid first: take Mid Bottom and Mid Top together. With Mail behind the B defenders and Vent toward A Ramps, you gain two extra attack routes.
Neutralize the height: before every site take, put a smoke or flash on Tower and Rafters. On A that means A Rafters and A Tower; on B, B Tower and B Rafters.
Viper wall as your backbone: a Toxic Screen across the site separates the defenders. You fight them one at a time instead of in a crossfire.
Hit A through Main and Ramps: an A hit with pressure from A Main and simultaneously up the Ramps from mid is one of the strongest attacks on Split.
Post-plant from high ground: after the plant, Tower and Rafters are strong positions for you too. Whoever is up top sees retakes coming early.
Often underrated in ranked: patience in mid. Many teams run straight through A Main or B Garage and straight into the defenders’ prepared utility. Take mid first and you force the defense to rotate – then you find the open site. Plan these executes beforehand on the strategy board.
Remember the ropes, too: a quick switch via A Sewer to A Lobby can turn a fake on B into a real A attack. But getting hit on a rope slows you down, so check first whether the exit at the top is clear.
Defending on Split: tips for the defender side
As a defender on Split you have a natural advantage: height. The trick is not to use it too predictably.
Control Mail and Vent: mid is the key to your rotations. One player with info utility near Mail or Vent sees attacks before they reach a site.
Swap towers, don’t camp: A Tower and B Tower are strong but well known. Take a kill from up top, then move to another spot – such as A Screens or B Alley.
Hold tight chokes with utility: mollies, Snake Bites and slows are twice as effective in narrow corridors like A Main or B Garage. Delay instead of taking the duel right away.
Retake through mid: if a site falls, come through Mail (for B) or through Vent and Ramps (for A) into the attackers’ backs.
Keep your ears on the ropes: every attacker coming down or up a rope is a slow, moving target for a moment. That’s exactly the moment you punish.
Watch the duplicate callouts: Split has Lobby, Rafters, Tower, Back and Site at both A and B. Always say the side – “B Tower”, not just “Tower”. A wrong callout sends your rotation the wrong way.
Split setups: Viper walls, Omen smokes & Cypher
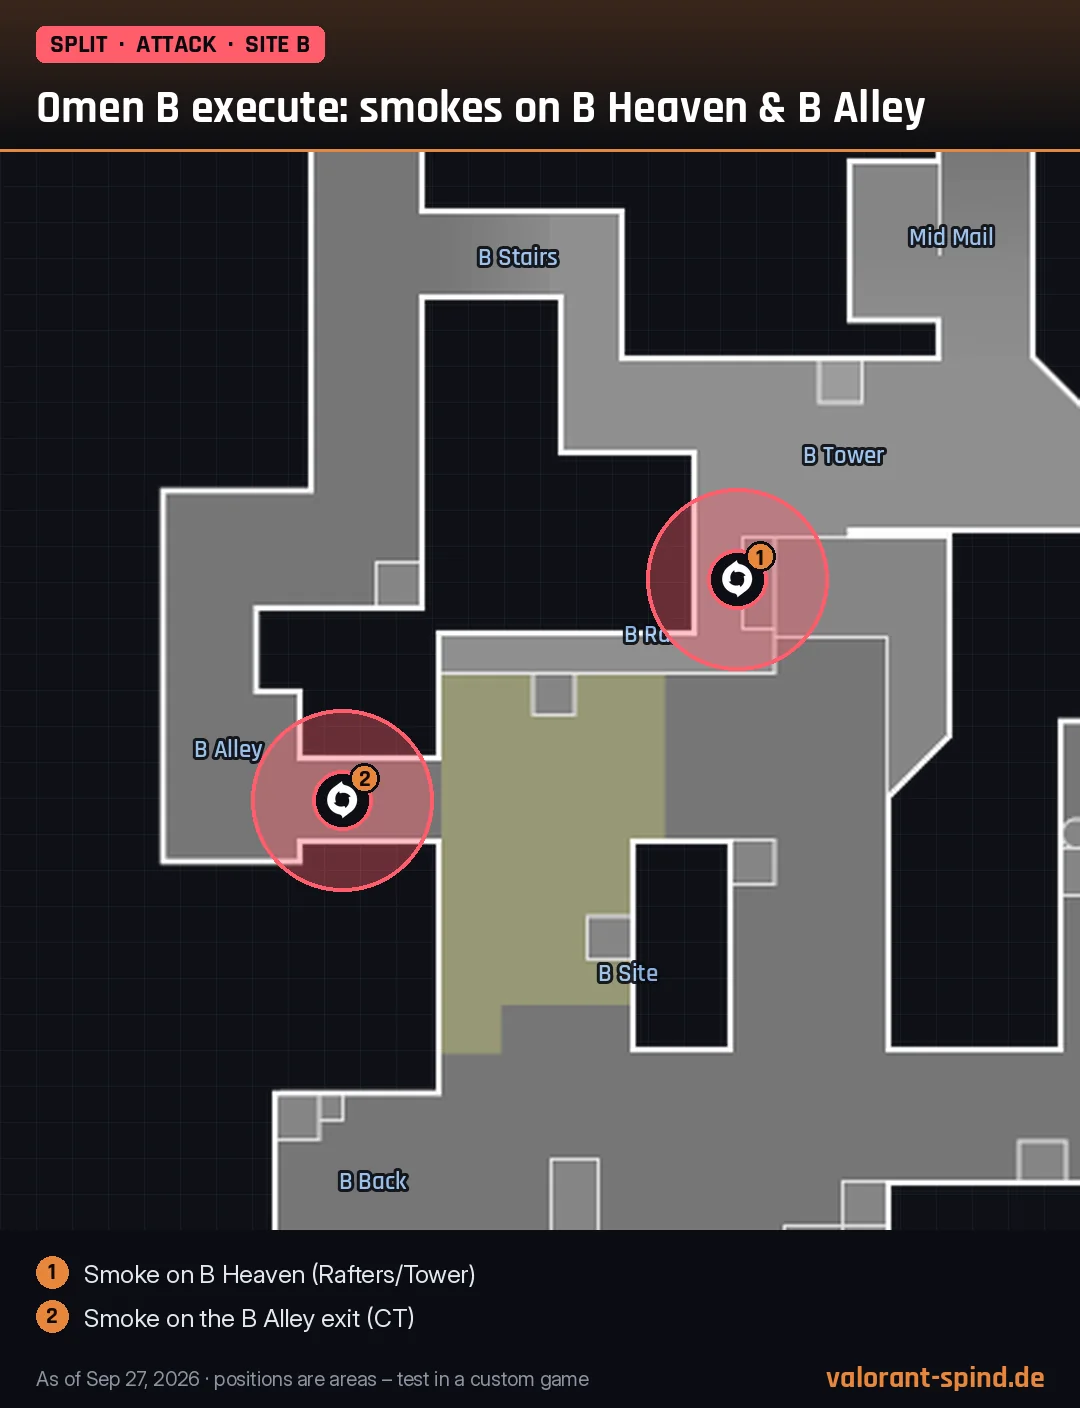
Here are the key Split setups to copy – no video needed: every position is marked on the official minimap, numbered and explained step by step. The agents are the ones actually played on Split in VCT 2026: Viper (100% presence) and Omen (94%) as the double controller for A and B, plus Cypher (16%) as the sentinel option.
Every Split setup on this page is backed by at least two matching sources. Pick a setup on the map – it zooms straight to the right spot. Important: the markers show the area, not the exact pixel. Try each setup once in a custom game before you use it in ranked.
Layout unchanged since the patch 6.0 rework (January 2023: A Main, A Rafters, A Tower, B Tower); A setups use 2023+ sources only, B site has been the same since 2.01. Agents picked by VCT 2026 presence on Split (vlr.gg): Viper 100%, Omen 94%, Cypher 16%.
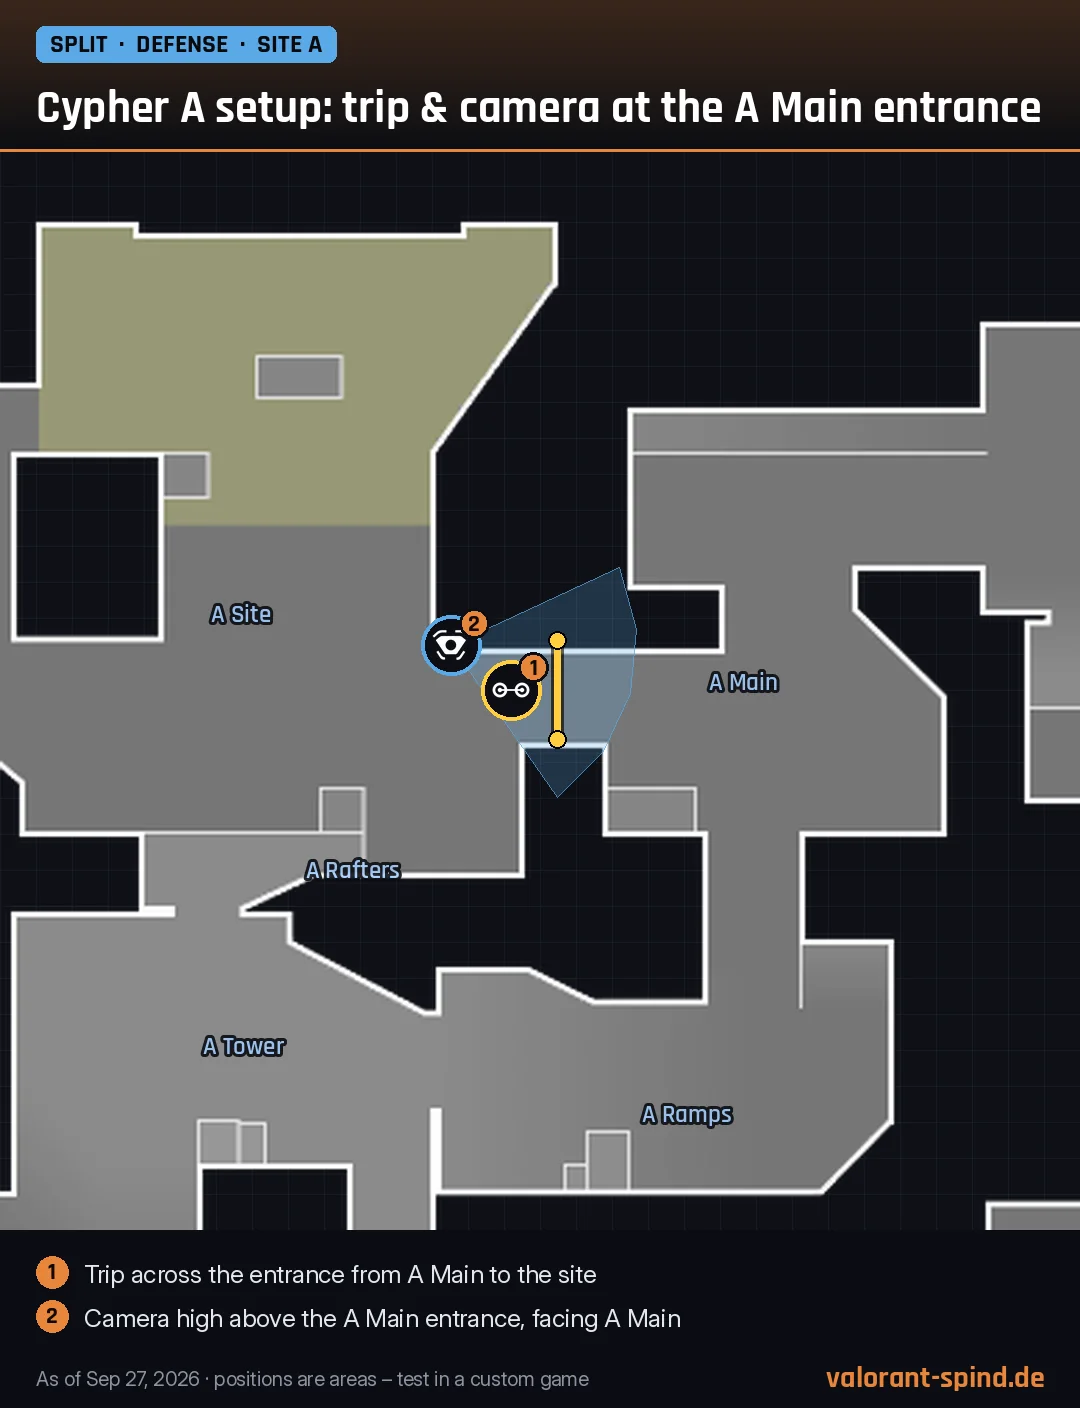
Cypher A setup: trip & camera at the A Main entrance
1Trip: Stretch the wire across the narrow entrance where A Main leads onto the site. Anchor one end on the corner with the flower pot so it doesn't stand out right away.
2Camera: Put the Spycam high on the wall right above the A Main entrance and face it toward A Main. You see how many attackers are coming before they reach the site.
+Tip: Use Cyber Cage in reaction to the trip – a teammate has to hold A Ramps and A Rafters (Heaven).
Covers: The attackers' main entrance onto A (A Main) – info before they step onto the site.
Weak spot: A push through A Ramps or Mid Vent bypasses this setup. Cypher is rare on Split (16% presence) – often a controller anchors A instead.
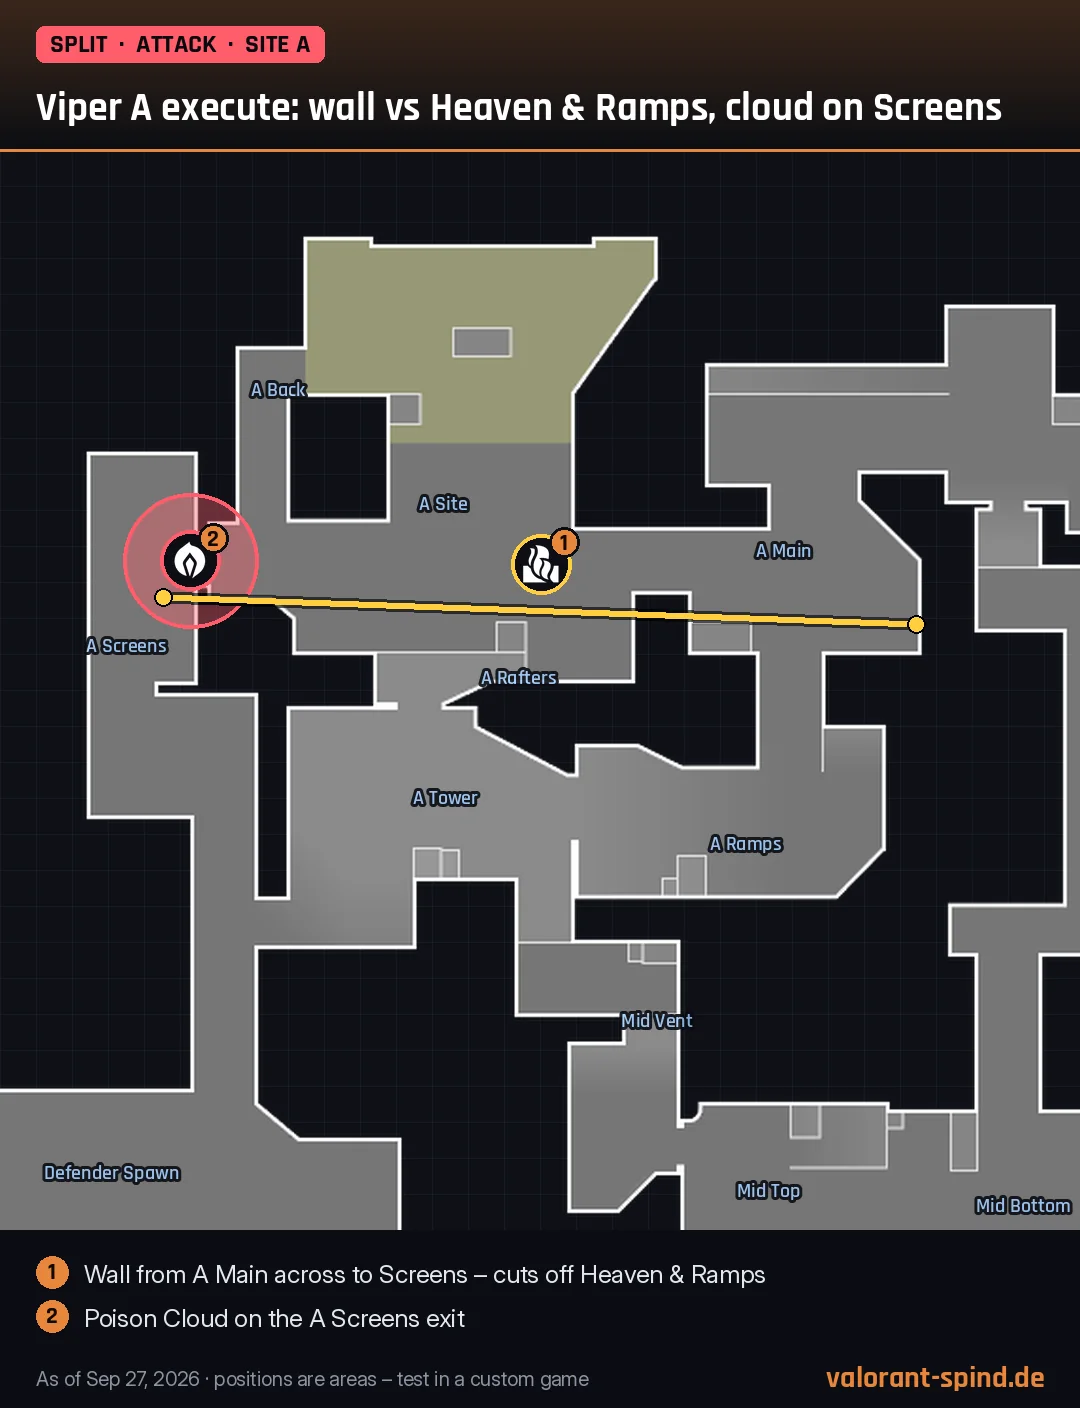
1Wall: Viper stands where A Lobby meets A Main and throws the Toxic Screen to the left toward the site. The wall runs along A Main across the site to Screens and blocks the view from A Ramps and A Rafters (Heaven).
2Cloud: Put the Poison Cloud on the A Screens exit. Defenders coming from spawn can no longer see the plant.
+Tip: Only raise the wall when the team pushes through A Main – otherwise the defense has too much time to adjust.
Covers: The defenders' three vision points on A: Heaven (A Rafters), A Ramps and A Screens.
Weak spot: The wall drops after a while – then Heaven is open again. You still have to clear A Back and the crates on site yourself.
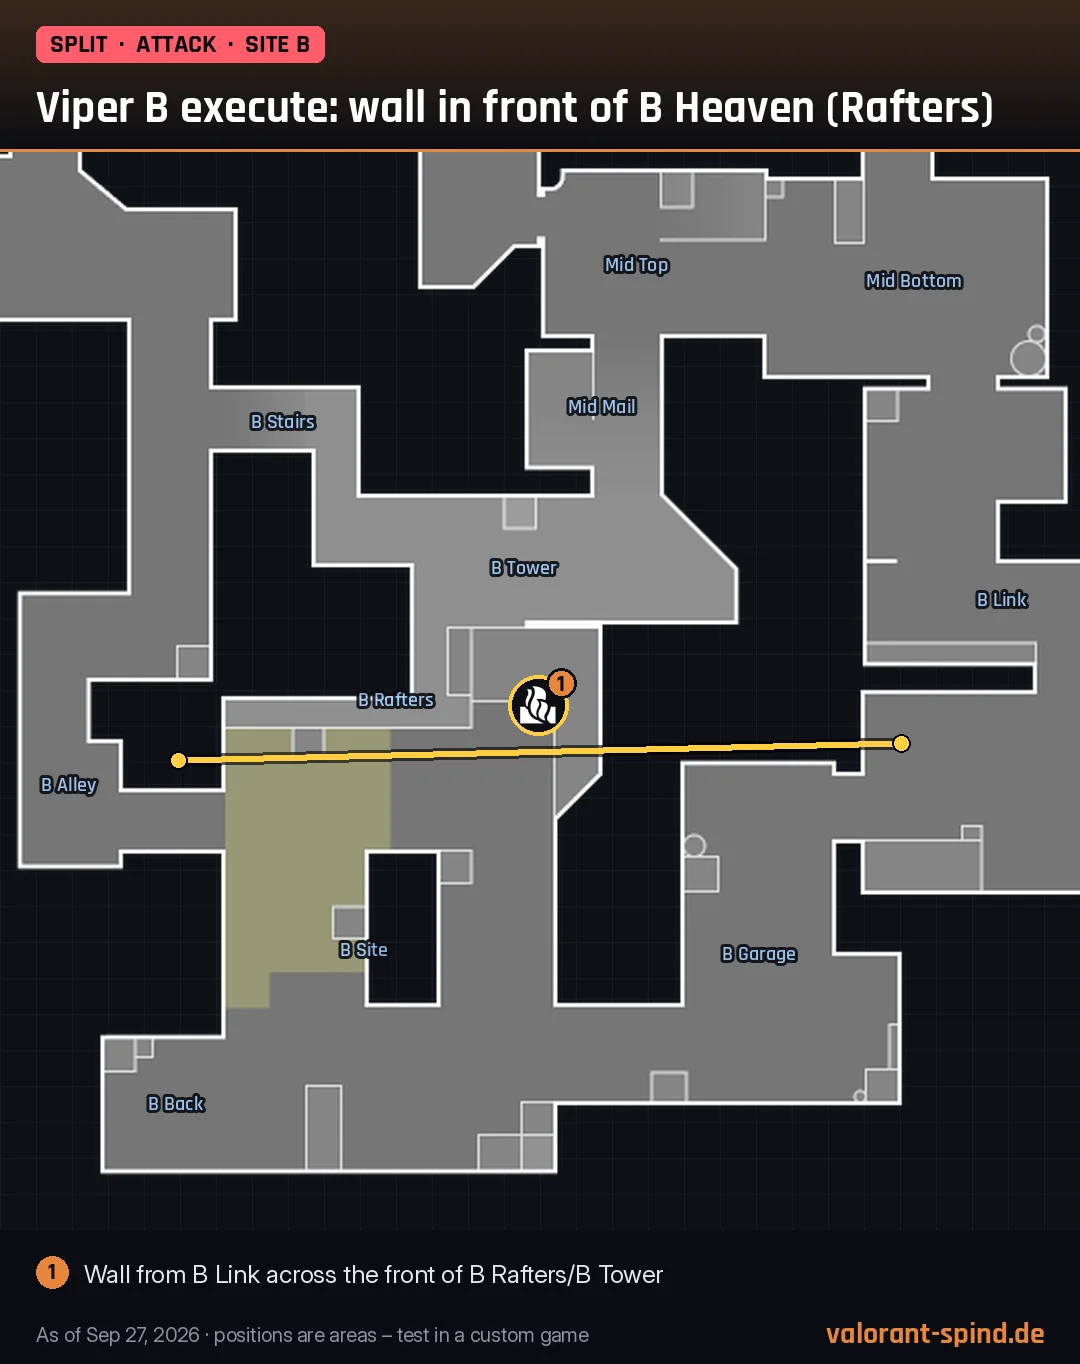
1Wall: Viper stands in B Link and throws the Toxic Screen west across the site. The wall runs right in front of B Rafters and B Tower (Heaven), so nobody up there can see the plant.
+Tip: Stay close to the wall as you push in – otherwise a defender in Heaven can see your head above it.
Covers: The strongest defender angle on B: B Heaven (Rafters and Tower).
Weak spot: B Alley and B Back stay open – that needs a second controller (Omen) or a flash.
If you do run a sentinel: Trapwires in narrow passages are especially effective on Split.
The agent test shows you which agent fits your style. You’ll find every agent compared in the agent tier list.
The 5 most common mistakes on Split
Split punishes certain mistakes harder than any other map. You’ll see these five in ranked all the time:
Mid without a plan: walking into Mid Top alone is dangerous. Take mid in pairs or with utility, or you’ll lose a player early.
Forgetting Tower and Rafters: walk onto a site without looking up and you’ll very often die from above on Split.
Ropes in a fight: on a rope you’re slow and predictable – and a hit slows you down even more.
Only one controller: with just one smoke agent the tight chokes are hard to split. If possible, run Viper plus a second controller.
Callouts without a side: “one Tower” is ambiguous on Split. Always put “A” or “B” in front.
Callout cheat sheet: what good calls sound like on Split
On Split, precise callouts matter even more than on other maps, because many names exist at both A and B and enemies can stand on several levels. A good callout names the number, side, spot and height. These examples use only names from the official map:
“One A Rafters, high” – an enemy is on the elevated spot on A site.
“Two Mid Top, one going Mail” – mid is held, one is rotating toward B Tower.
“Rope A Sewer” – someone is using the rope between Sewer and A Lobby right now.
“B Tower empty, Garage three” – the tower is clear, three attackers are coming through B Garage.
“Vent checked, clear” – nobody is in Mid Vent, A Ramps is safe.
“Spike A Site, behind the box” – exact spike position for the retake.
The most important rule on Split: always call the side. “Tower” alone can mean A Tower or B Tower – and in the worst case it sends three players the wrong way. Height is just as helpful: “high” or “low” tells your team instantly where to aim.
Split compared to every Valorant map
Split is one of the most vertical maps in the game. While Ascent, for example, works through an open mid and doors and Lotus through three sites and rotating doors, Split is decided above all by control of height and tight passages. The table shows all 13 Valorant maps and their key differences:
Here’s how to get comfortable on Split fast – using the tools on Valorant-Spind:
5 minutes of map study: turn on “All names” above and memorize the duplicate names at A and B in particular.
3 minutes of quiz: play the Split callout quiz until you hit at least 8 out of 10.
5 minutes in a custom game: ride every rope once – A Sewer, B Tower, Vents – and check the sightlines from A Tower and B Tower.
2 minutes of tactics: for Split, draw an A hit through Main and Ramps on the strategy board.
Next up are the other maps in this cluster: Ascent with its doors and open mid, and Lotus with three sites and rotating doors. For the basics, we recommend the beginner guide.
Split FAQ
How many callouts does Split have?
The official Split map has 24 callouts: 9 on the A side, 9 on the B side, 4 in mid, plus attacker spawn and defender spawn.
Is Split in the map pool right now?
Yes. Split has been in rotation since patch 11.08 (October 14, 2025) and is part of the Competitive pool since patch 13.04: Ascent, Abyss, Haven, Lotus, Split, Summit and Sunset.
Where is Split set in the Valorant world?
Split takes place in the Shinjuku district of Tokyo, Japan.
Where are the ropes on Split?
Ropes (ascenders) run between A Sewer and A Lobby, from B Hell up to B Tower, and in mid inside the Vents. Split was the first map with ascenders.
Do you get slowed on a rope?
Yes. Since patch 1.09 you are slowed by hits (tagging) even while on a rope. That’s why you shouldn’t use ropes in the middle of a firefight.
What are the best agents on Split?
In pro play, Viper is locked in with 100% presence, Omen follows at 94%, then Neon, Fade and Phoenix. The most-played pro comp is Neon, Phoenix, Fade, Omen, Viper.
Why do pros run two controllers on Split?
Split has many tight passages and elevated positions. Two controllers can cover more of them at once with smokes or walls – for example Viper’s Toxic Screen across an entire site and Omen’s Dark Cover on Tower and Rafters.
What is Heaven on Split?
Heaven refers to the elevated positions above the sites – A Rafters and B Rafters on the official map, each right next to A Tower and B Tower.
When was Split removed from the map pool?
For the first time with patch 5.0 in June 2022. With patch 6.0 in January 2023, Split returned with a rework and was later out of the pool again at times. It has been back since patch 11.08.
What’s the fastest way to learn the Split callouts?
Use the interactive Split map on this page with “All names” turned on, then the callout quiz until you score 8 out of 10. Pay special attention to the duplicate names at A and B.
Where does Viper put her wall on Split?
For A, the Toxic Screen runs from A Main across the site to Screens and blocks the view from A Rafters (Heaven) and A Ramps. For B, Viper throws the wall from B Link right along the front of B Rafters and B Tower.
Which smokes does Omen need on Split?
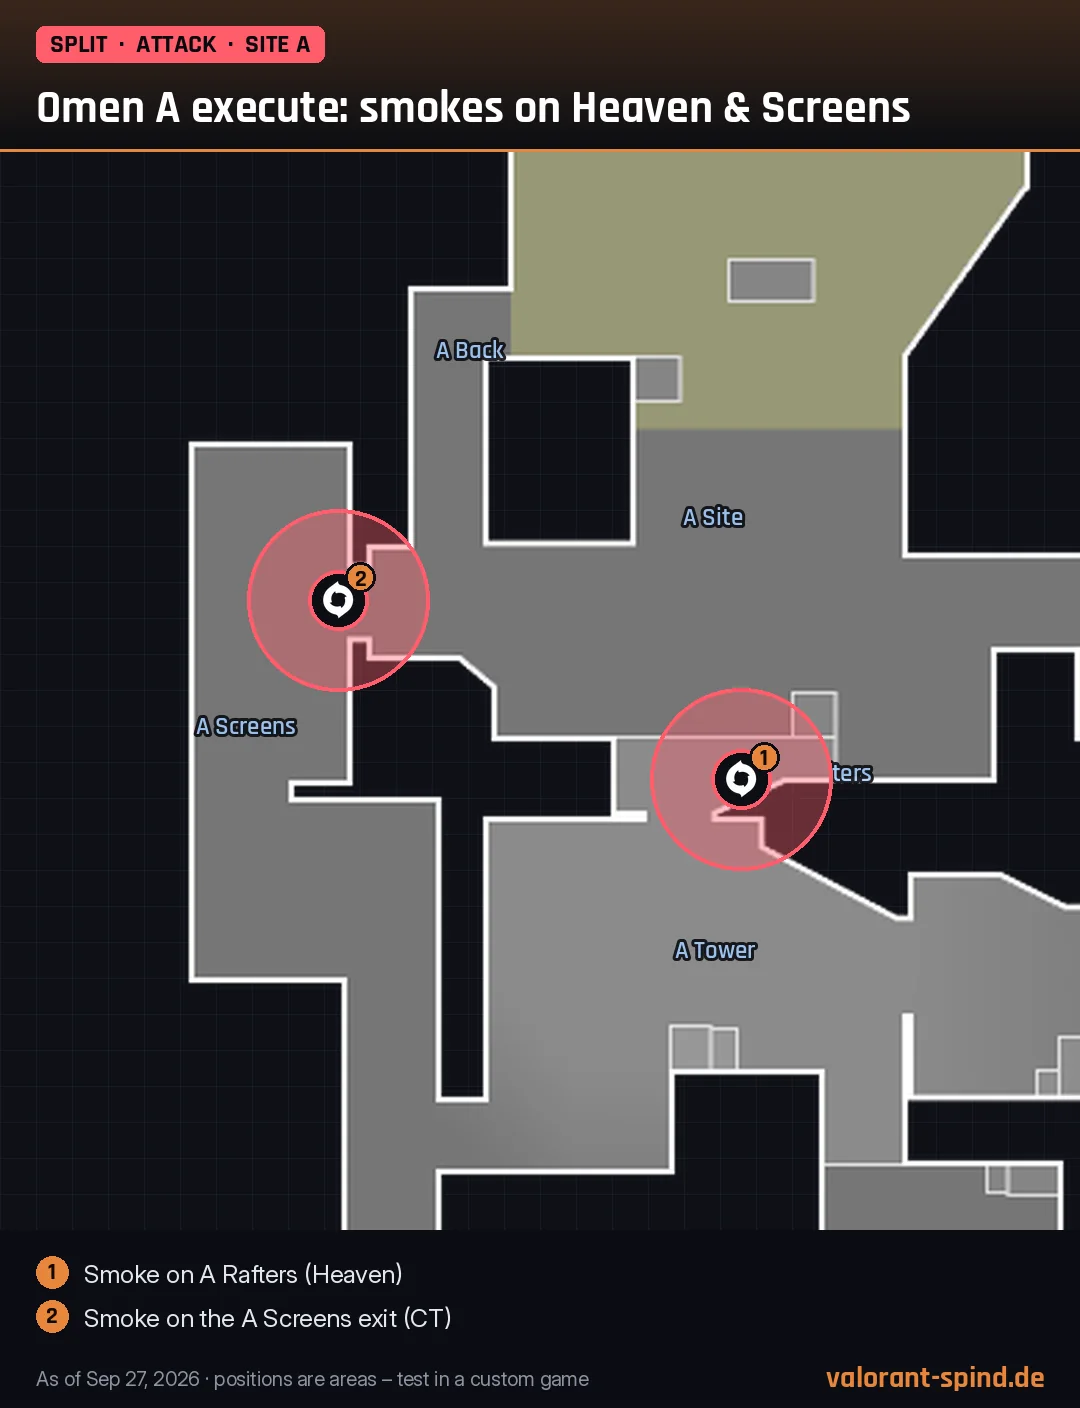
On A, Omen smokes A Rafters (Heaven) and the A Screens exit; on B, the Heaven area at B Rafters/B Tower and the B Alley exit.



 Cypher
 Trip: Stretch the wire across the narrow entrance where A Main leads onto the site. Anchor one end on the corner with the flower pot so it doesn't stand out right away.
 Camera: Put the Spycam high on the wall right above the A Main entrance and face it toward A Main. You see how many attackers are coming before they reach the site.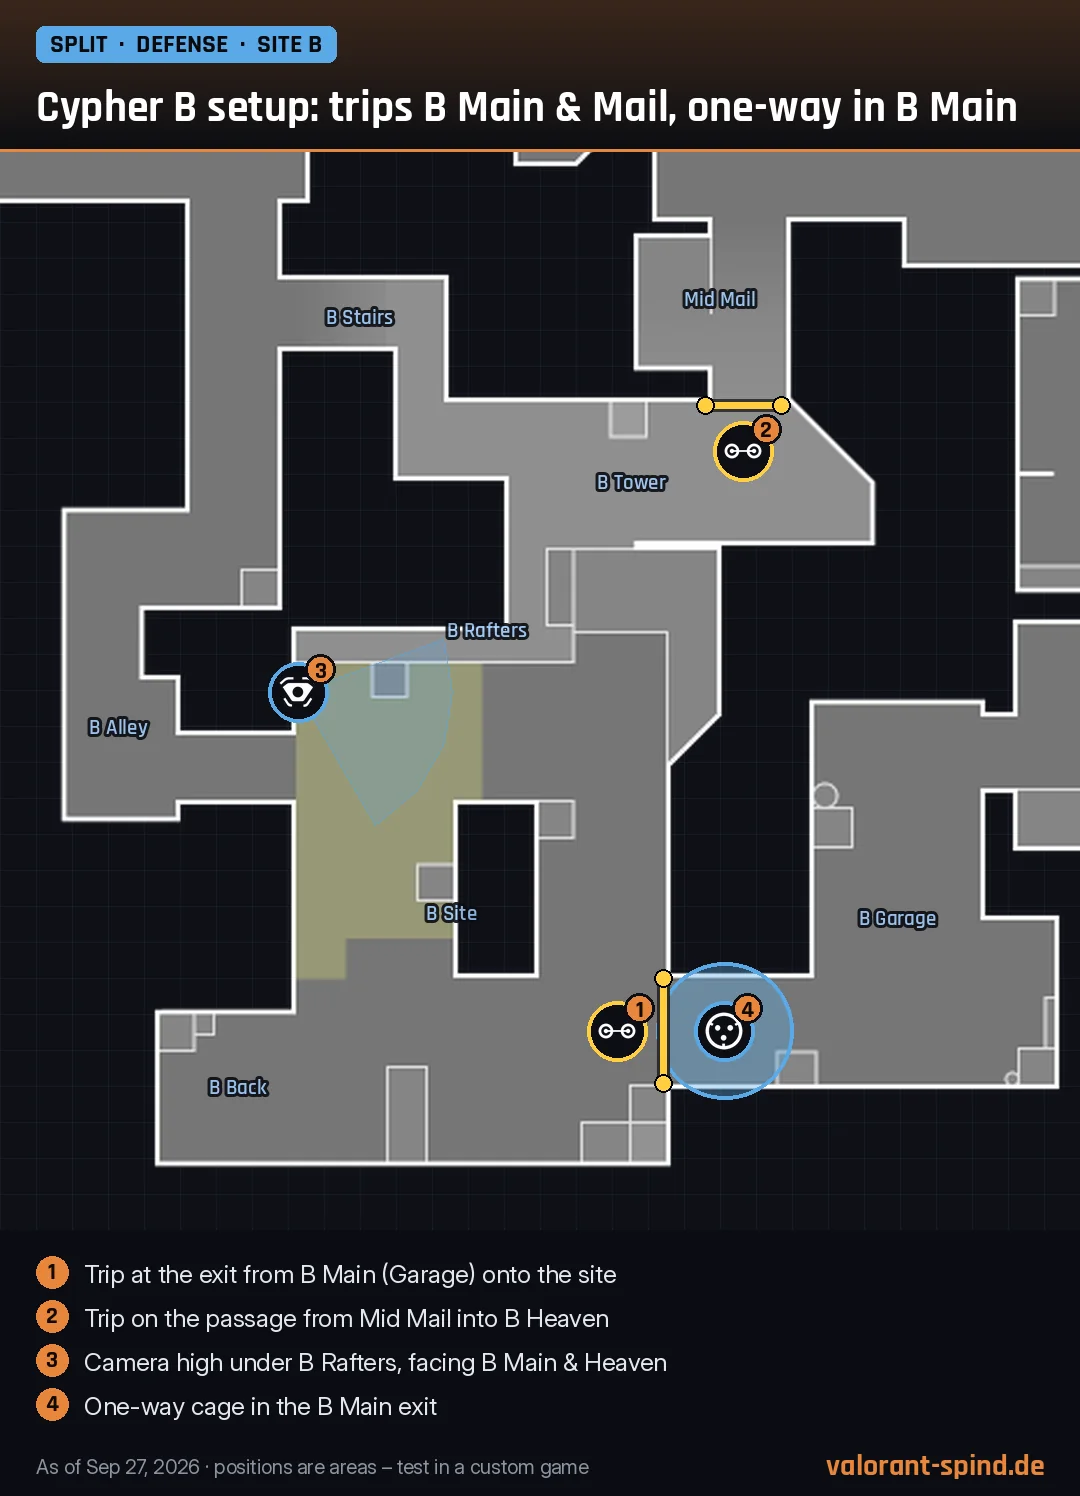

 Viper
Viper

 Omen
Omen